If you have a Synology with an x86 CPU it is very easy to run Docker Containers on your Synology. If you have a ARM-based Synology systems, this does not work, because most of the Docker Images requires a x86 architecture
My Setup
- Synology DS718+ with 2GB RAM by default {target=_blank rel=noopener}
- Kingston 8 GB RAM Extension {target=_blank rel=noopener}
- WD RED 6 TB Primary HDD {target=_blank rel=noopener}
- WD RED 6 TB Secondary HDD {target=_blank rel=noopener}
- 128 GB SanDisk Ultra External USB {target=_blank rel=noopener}
Install Docker from the Package Center
Open your Package Center, search for Docker in the top-bar and install the Docker package.

If the package is installed, open Docker.
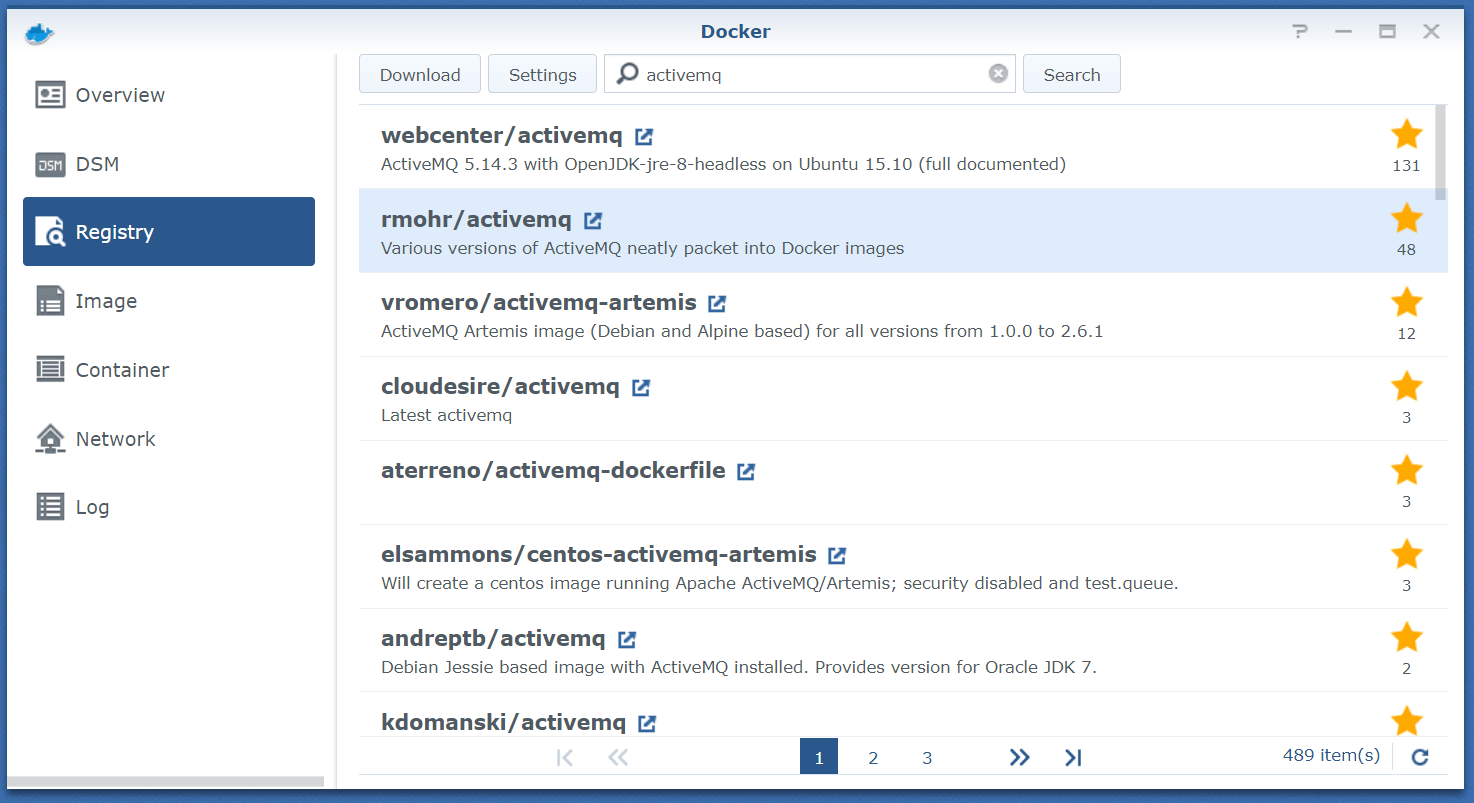
Load ActiveMQ from registry
Search for ActiveMQ in the official Docker Registry and right-click on rmohr/activemq to download the image.
I have used the version 5.15.4-alpine (rohr/activemq:5.15.4-alpine). This image is open source on GitHub
{target=_blank rel=noopener}

Launch ActiveMQ
Click on the downloaded rmohr/activemq image and press the Launch button.
A window opens where you can configure your ActiveMQ container.

Setup Name and limit Resources

If you want to limit the resource to a container, you can set the priority and max RAM-usage. For my test cases I limit to 512 MB.
Setup Advanced Settings
On the same window you have a button Advanced Settings
Enable AutoStart - if you want
AutoStart means the Docker Container will automatically start, if your System starts. This makes sense.
Volume
Map a folder for your data. Otherwise your data will be inside your container! This means you will not be able to upgrade your container to a new ActiveMQ version and you will lose all data if you delete your container.
In my case I do not have any mappings because I don’t need persistent data on upgrades for my tests.
Port Settings
ActiveMQ uses several ports. You can use Docker-automapping or define own port ranges. Ex: ActiveMQ here uses the Port Range 3705x and I give the different container ports specific local ports.

Links
You do not need any settings here.
Environment
You do not need any settings here.
Admin Tool
The ActiveMQ admin UI listens in my case to port 37050. Just use your Synology local address and the defined port (https://yourSynology:1234) and connect.
The default username is admin and the default password is admin.
Related articles
Dec 27, 2025 · 4 min read
Install Home Assistant on Synology NAS with Docker
Die deutsche Version findest du hier: Home Assistant via Docker auf einer Synology NAS installieren Home Assistant is the “hub” …
Dec 27, 2025 · 5 min read
Home Assistant via Docker auf einer Synology NAS installieren
You can find the English version of this guide here: Install Home Assistant on Synology NAS with Docker Home Assistant ist für viele der …
Oct 22, 2025 · 18 min read
Vaultwarden (Bitwarden) mit Docker auf Synology NAS selbst hosten
You can find the English version of this guide here: Self-Hosting Vaultwarden (Bitwarden) on Synology NAS with Docker …
Author

BEN ABT
Ben is a Principal Software Engineer at Medialesson.de, with a strong focus on .NET and Microsoft Azure. In his professional role, he designs and builds highly scalable platforms for hybrid and cloud-based scenarios. He also advises companies and C-levels on migrating to the sovereign cloud.
He runs myCSharp.de, the largest and most active German-speaking C# community forum, actively contributes to both his own and external open-source projects and regularly shares his knowledge through his blog, at community events, conferences and as a writer for technical magazines.
Let's Work Together
Looking for an experienced Platform Architect or Engineer for your next project? Whether it's cloud migration, platform modernization or building new solutions from scratch - I'm here to help you succeed.
Comments