On this page
You can find the German version of this guide here: Vaultwarden auf Synology mit Docker selbst hosten
Password manager services have become significantly more expensive in recent years. At the same time, my trust in commercial providers - especially from the USA - has decreased. As someone who values digital sovereignty, it was time for me to regain control over my passwords. I tried Proton Pass for a year - but I’m not really satisfied: the features in the app are limited and synchronization with browsers doesn’t always work. The browser integration and password field recognition still seem to be in their infancy.
The solution: Vaultwarden (a resource-efficient, unofficial Bitwarden server implementation) on my own Synology NAS. This way, my passwords remain in my network without internet exposure, under my control - and I save money in the process.
This guide shows step by step how to set up Vaultwarden on a Synology NAS with Docker - including HTTPS certificates and VPN access for maximum security.
TL;DR (What you’ll build)
- A private DNS name (e.g.,
vault.ben) pointing to your NAS - A custom Root CA trusted on all clients (Windows/macOS/iOS/Android)
- A server certificate for
vault.ben(max. 397 days validity) - A Synology reverse proxy (HTTPS termination + WebSockets)
- A Vaultwarden container only reachable via LAN/VPN (no public exposure)
Why Vaultwarden?
Digital Sovereignty: Passwords remain in your own network. No dependency on cloud services or foreign servers.
Full Control: Self-determined decisions about backups, updates and security policies.
Bitwarden Compatibility: Vaultwarden is API-compatible with Bitwarden. All official Bitwarden clients (browser extensions, desktop apps, mobile apps) work flawlessly.
Goal
- Self-hosting Bitwarden (Vaultwarden) on my Synology NAS
- Synchronization across various devices (Windows workstation, Windows laptop, iPhone)
- Synchronization with browsers (Edge, Brave, Chrome, Firefox)
- No direct access via the internet, instead via VPN to LAN
Prerequisites
- Synology NAS with Docker support
- Basic knowledge of using Docker and Synology DSM
- A configured VPN to access the home network
- Backup strategy for the NAS and Vaultwarden files
Preparation
Bitwarden clients strictly require HTTPS connections. This means we can’t just start the Docker container - we need a few elements around it.
- We want a non-public domain that is only resolved in the local network/via VPN, e.g.,
vault.ben. - This domain must have a valid SSL certificate that is accepted by the clients.
- This requires a reverse proxy that provides HTTPS and forwards requests to the Docker container.
Important: Don’t use real domains that exist on the internet! Instead, use a fictional domain like vault.ben or combine it with your name (in my case, e.g., passwordmanager.abt), which is only resolved in your local network.
Step 1: Create DNS Entry for vault.ben
For the domain vault.ben to point to the NAS, a DNS entry must be created.
DNS Server in the Network
When using a dedicated DNS server (e.g., UniFi, Pi-hole, AdGuard Home or a router with DNS functions), an A record must be created:
1vault.ben → 192.168.1.100
192.168.1.100 should be replaced with the static IP address of the Synology NAS.
Important: Use a static IP for your NAS (either set a fixed IP on the NAS or create a DHCP reservation in your router).
Step 2: Create Root CA
vault.ben is not an official domain since .ben is not a registered top-level domain (TLD). Therefore, we can’t just create a self-signed certificate but must first create our own Root Certificate Authority (Root CA) and make it known on all devices where we want to use Vaultwarden.
What is a Root CA?
A Root CA is the top instance of a certification hierarchy. When the Root CA is installed as “trustworthy” on devices, all certificates signed by this CA are automatically accepted - without browser warnings. Basically, the same as how HTTPS certificates work on the internet.
Create Root CA:
I wrote a detailed guide here: Create Custom Root Certificate Authority
Alternatively, tools like dools.dev (Disclaimer: created by me) can be used. Important: The certificates are generated locally in the browser, not on a server - so the Root CA remains private.
Install Root CA on Devices:
The Root CA certificate (.der file) must now be installed on all devices that should have access to Vaultwarden:
Windows:
- Double-click the
.derfile - Select “Install Certificate”
- Choose “Local Machine” (requires administrator rights)
- “Place all certificates in the following store” → “Trusted Root Certification Authorities”
- Complete installation
macOS:
1sudo security add-trusted-cert -d -r trustRoot -k /Library/Keychains/System.keychain /path/to/root-ca.der
iPhone/iPad:
- Transfer Root CA (*.der file) to the device via AirDrop, OneDrive, email or cloud service
- Open file - “Profile Downloaded” appears
- Settings → General → VPN & Device Management
- Select and install profile
- IMPORTANT: Settings → General → About → Certificate Trust Settings
- Activate Root CA (switch to “green”)
Android:
- Copy Root CA (*.der file) to the device
- Settings → Security → Encryption & credentials → Install a certificate
- Select “CA certificate”
- Confirm security warning
- Select
.derfile
Important: After installation, all browsers must be restarted for the Root CA to be recognized! Wait a few minutes before continuing, as it sometimes takes a moment for the system to load the new certificates (especially iOS).
Save the generated Root CA files securely, as they are needed for creating server certificates (also in the future).
Step 3: Create SSL Certificate for vault.ben
After the Root CA is set up, we can now create a server certificate for vault.ben:
Guide: Create HTTPS Certificates with Custom Root CA
Alternatively: Use dools.dev .
Important Parameters When Creating:
- Common Name (CN):
vault.ben - Subject Alternative Names (SAN):
DNS.1 = vault.benIP.1 = 192.168.1.100(the NAS IP)
- Validity: Maximum 397 days (No more, as this is a limit e.g., from Apple. Certificates with longer validity are not accepted by iOS/macOS.)
You will receive the following files:
vault.ben.key- Private Key (keep secret!)vault.ben.crt- Server certificatevault.ben-fullchain.crt- Fullchain (certificate + Root CA)
We’ll need these files later for the reverse proxy!
Also save these certificates securely, as they are needed for later renewal. Make a calendar entry to renew the certificate in time (e.g., 1 week before expiration).
Installing Vaultwarden in Docker
Now it gets practical: we install Vaultwarden as a Docker container on the Synology NAS.
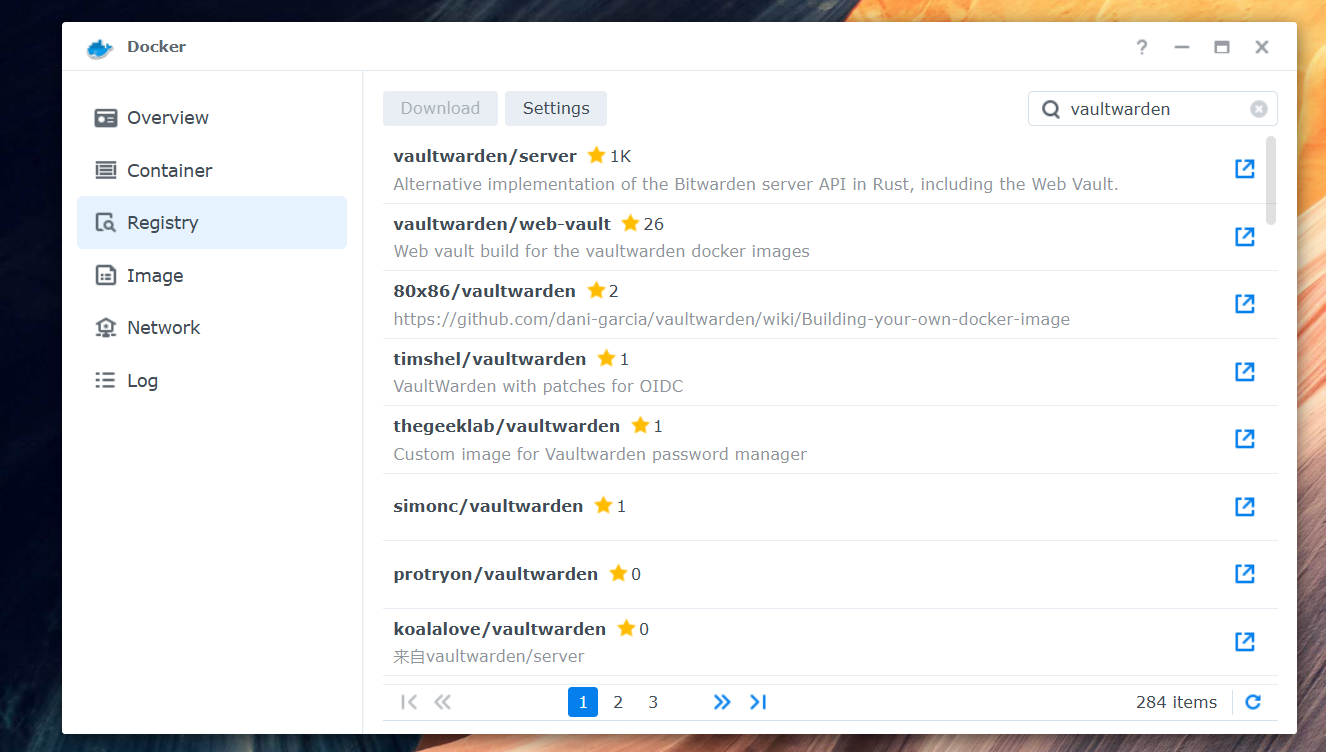
Step 1: Download Docker Image
- Open the Docker package on your Synology NAS (if not installed: Package Center → search for “Docker” and install)
- Navigate to Registry (left sidebar)
- Search for
vaultwarden/server - Select the official vaultwarden/server image (GitHub project )
- Click Download and select the tag
latest(or a specific version)
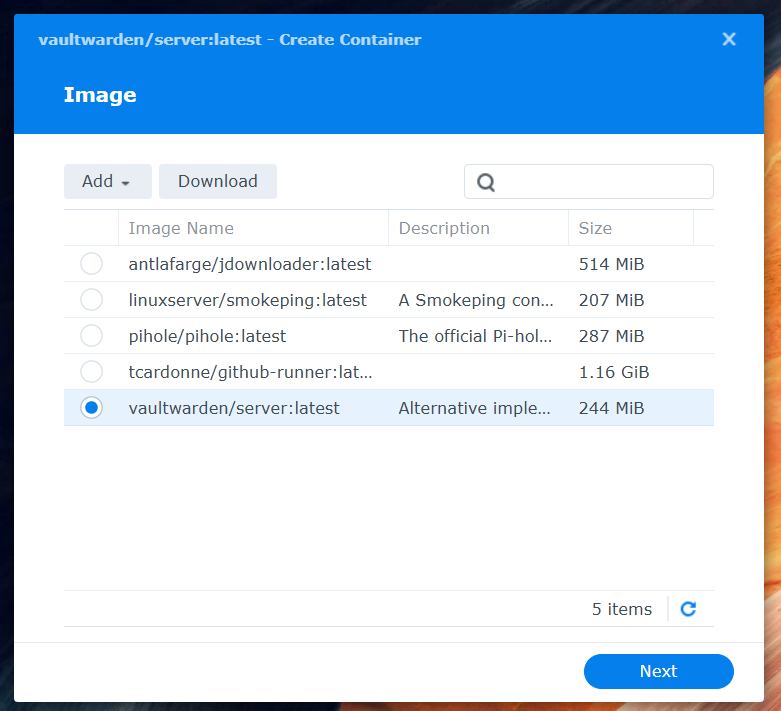
Step 2: Create Container
- Switch to Image in the left sidebar
- Select the downloaded
vaultwarden/serverimage - Click Launch
- A wizard opens
Container Settings:
- Container Name:
vaultwarden(or another name) - Enable auto-restart: ✅ Activate (container starts automatically after NAS restart)
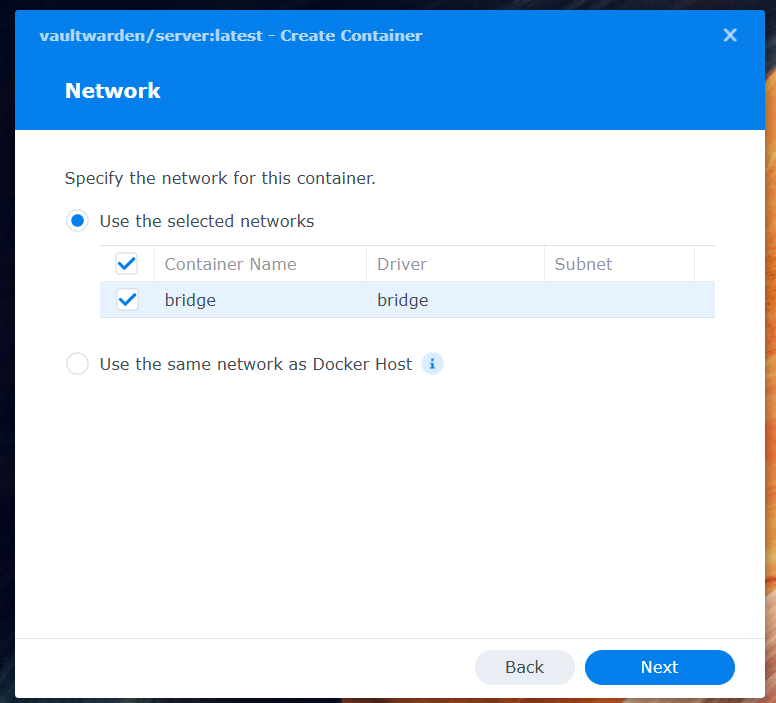
Step 3: Configure Network
Click Advanced Settings.
In the Network tab:
- Make sure Bridge is enabled
- This enables communication with the reverse proxy
Step 4: Set Up Port Mapping
In the Port Settings tab:
Vaultwarden runs internally on port 80. We map this to a free port on the NAS:
- Local Port:
31850(or another free port of your choice) - Container Port:
80 - Type: TCP
Why not port 80? Port 80 is already occupied by the DSM web interface on most NAS systems. Choose a free port > 30000.
Step 5: Volume Mappings (Persistent Storage)
In the Volume tab:
So that passwords are not lost when the container is recreated, data must be stored outside the container.
Create Folder on NAS:
- Open File Station
- Navigate to a secure location (e.g.,
/docker/) - Create a new folder:
vaultwarden - Inside it, a subfolder:
data
Full Path: /docker/vaultwarden/data
Add Volume Mapping:
- File/Folder:
/docker/vaultwarden/data - Mount Path:
/data - Permission: Read/Write
Security Note: Make sure the folder is only accessible by the admin user. Do not create shared folders for Vaultwarden data!
Step 6: Configure Environment Variables
In the Environment tab:
Here we configure security-relevant settings.
Important Environment Variables:
| Variable | Value | Description |
|---|---|---|
SIGNUPS_ALLOWED | false | Prevents strangers from self-registering |
ADMIN_TOKEN | <YourStrongToken> | Password for the admin interface |
Generate Admin Token:
The admin token protects the admin interface at /admin. You have two options:
Option 1: Simple String (not recommended)
Simply use a strong password, e.g., MySuper$ecur3Pa$$w0rd!2025
⚠️ Warning: Vaultwarden will then show a warning in the admin interface that the token is not securely hashed.
Option 2: Argon2id Hash (recommended)
Generate an Argon2id hash of your password. Tools:
- dools.dev (supports Vaultwarden presets)
- argon2.online
Argon2 Parameters (Vaultwarden Default):
| Parameter | Value | Explanation |
|---|---|---|
| Plain Text | <YourStrongPassword> | Your admin password |
| Salt | <RandomString> | Increases security (e.g., MyNAS2025!) |
| Parallelism Factor | 4 | Number of threads (OWASP standard) |
| Memory Cost | 65536 | 64 MB RAM (secure standard) |
| Iterations | 3 | Balance between security and performance |
| Hash Length | 32 | Hash length in bytes |
| Type | Argon2id | Important: Vaultwarden uses Argon2id! |
Example Result:
1$argon2id$v=19$m=65536,t=3,p=4$TXlOQVMyMDI1IQ$r22Y1WUbyOSx4k7xBQWOvAK8Hn3mPqR5tUvWxYz
Use this string as the value for ADMIN_TOKEN.
Add Environment Variables:
Click + and add:
1SIGNUPS_ALLOWED=false
2ADMIN_TOKEN=$argon2id$v=19$m=65536,t=3,p=4$TXlOQVMyMDI1IQ$r22Y1WUbyOSx4k7xBQWOvAK8Hn3mPqR5tUvWxYz
Step 7: Create Container
Click Apply and then Next to review the settings.
Finally, click Done - the container is created but not yet started. We’ll do that later after configuring the reverse proxy.
Setting Up Reverse Proxy
Vaultwarden is now running in the Docker container but is not yet accessible via HTTPS. For this, we need a reverse proxy that:
- Receives HTTPS requests
- Provides the SSL certificate
- Forwards requests to the Docker container
Synology DSM offers an integrated reverse proxy in the Application Portal. We use this to make Vaultwarden securely accessible.
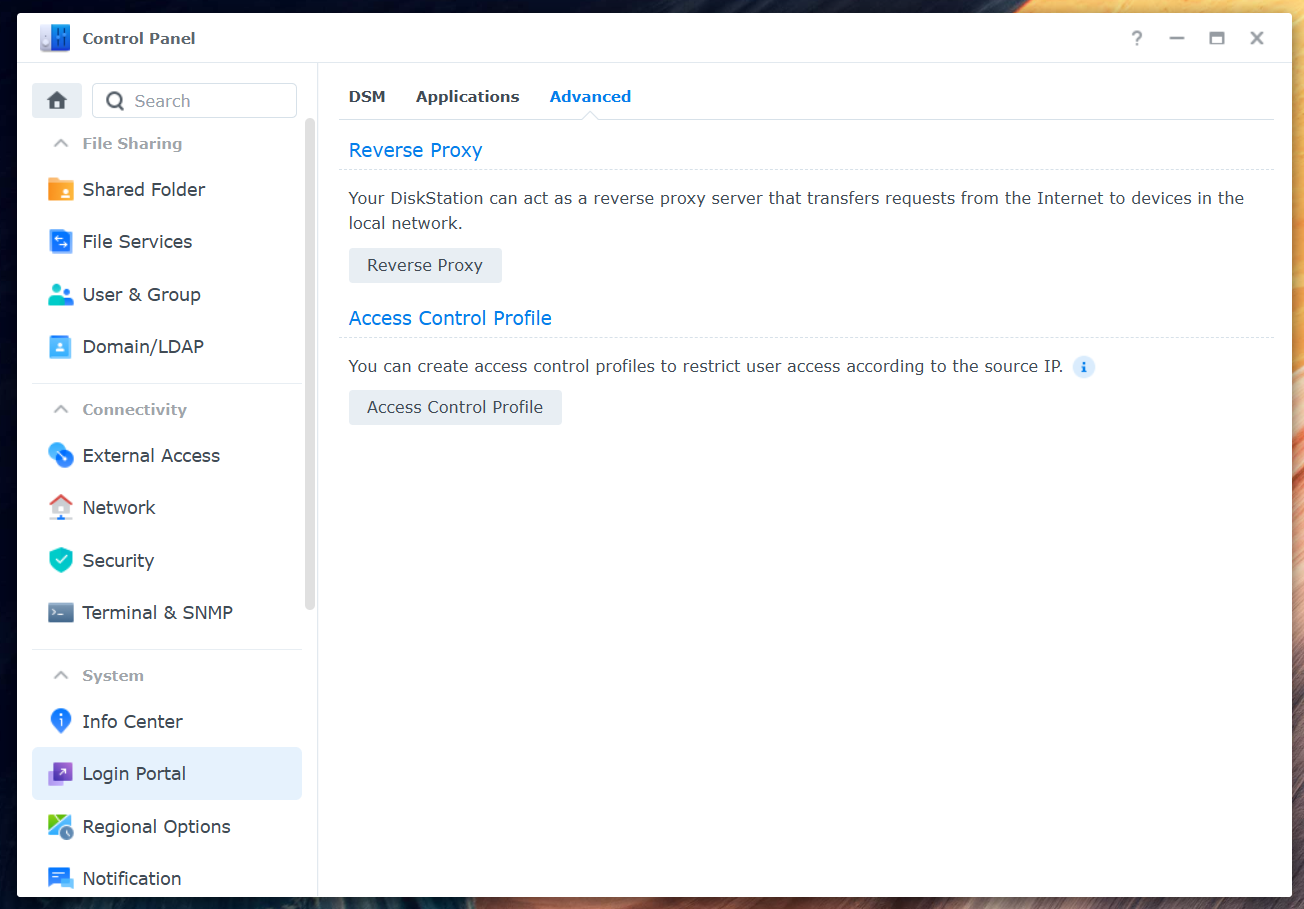
Step 1: Open Application Portal
- Open Control Panel in DSM
- Navigate to Login Portal (or Login Portal / Application Portal, depending on DSM version)
- Switch to the Advanced → Reverse Proxy tab
Step 2: Create Reverse Proxy Rule
Click Create to create a new reverse proxy rule.
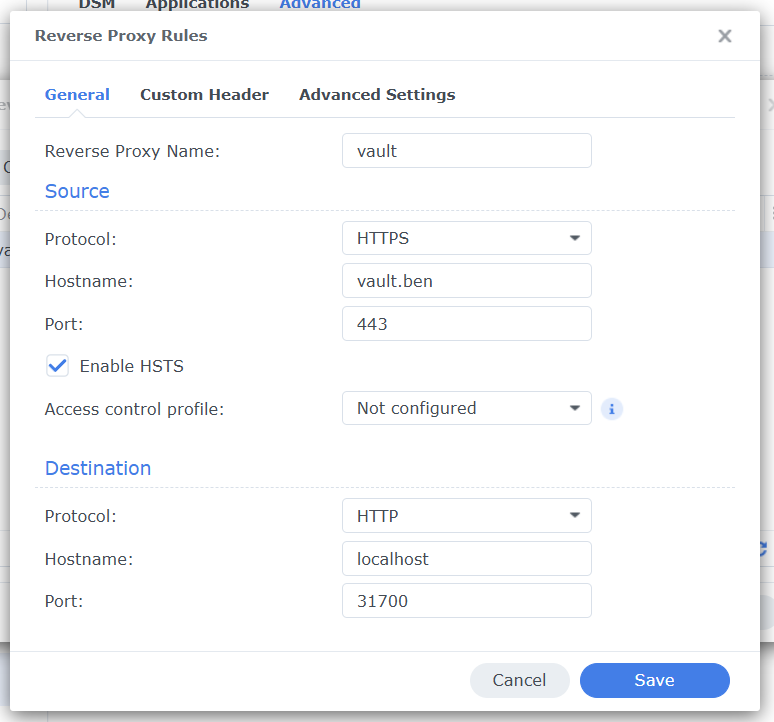
Source:
- Description:
Vaultwarden(or another name of your choice) - Protocol:
HTTPS✅ Important: HTTPS, not HTTP! - Hostname:
vault.ben - Port:
443(standard HTTPS port, do not change)
Destination:
- Protocol:
HTTP(the Docker container runs internally without HTTPS) - Hostname:
localhost(since the container runs on the same NAS) - Port:
31850(the port we configured for the Docker container)
Step 3: Add WebSocket Headers
Vaultwarden uses WebSockets for real-time synchronization between clients. Without these headers, live synchronization won’t work!
Click on the Custom Header tab.
Click Create → WebSocket
DSM automatically adds the correct headers:
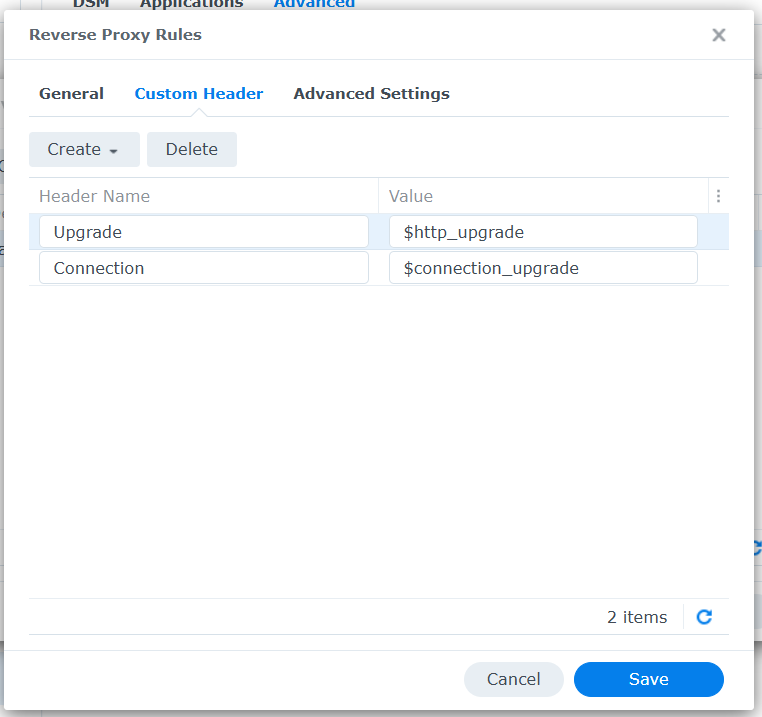
Upgrade→$http_upgradeConnection→$connection_upgrade
Why important? Without WebSocket support, real-time synchronization doesn’t work. Changes are only visible after manual refresh.
Step 4: Save Rule
Click Save to create the reverse proxy rule.
The rule now appears in the overview. Don’t test yet - we must first assign the HTTPS certificate!
Setting Up HTTPS Certificate
Now the SSL certificate we created in the preparation comes into play. We need to import it into DSM and assign it to the reverse proxy.
Step 1: Import Certificate into DSM
- Open Control Panel
- Navigate to Security → Certificate
- Click Add → Add a new certificate
- Select Import certificate
You need the files you received when creating the certificate:
Required Files:
- Private Key:
vault.ben.key - Certificate:
vault.ben-fullchain.crt(or.pem) - Intermediate Certificate (optional): If you don’t have a fullchain certificate, add the Root CA here
Why Fullchain? The fullchain certificate contains both the server certificate and the Root CA. This means the Root CA doesn’t have to be uploaded separately as an intermediate certificate. It’s therefore more convenient.
Step 2: Name and Save Certificate
Give the certificate a meaningful name, e.g., Vaultwarden - vault.ben
Click OK to import the certificate.
Step 3: Assign Certificate to Reverse Proxy
Now we need to assign the certificate to the reverse proxy rule:
- Stay in the certificate area of the control panel
- Click Settings (or Settings)
- A window opens with all services that can use certificates
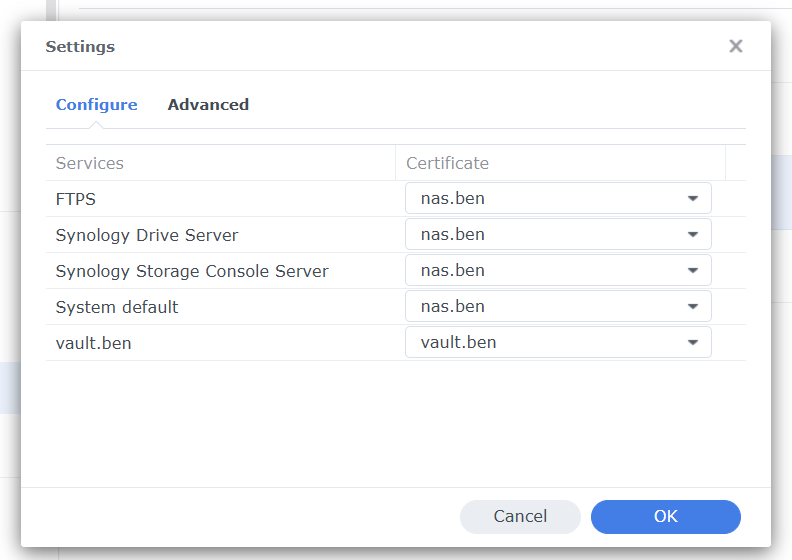
- Look for
vault.benin the list (the reverse proxy rule) - Select the just imported certificate from the dropdown menu
- Click OK
Success Check:
If everything worked, a green lock symbol appears next to the certificate in the certificate list. This means the certificate is active and being used by the reverse proxy.
Important: DSM can manage multiple certificates. Make sure you’ve assigned the correct certificate to the correct reverse proxy rule!
Starting Docker Container
All preparations are complete! Now we can start the Vaultwarden container.
- Open the Docker package on the Synology NAS
- Navigate to Container in the left sidebar
- Select the
vaultwardencontainer - Click Action → Start (or the play button)
The container starts within a few seconds. You can see the status in the container overview:
- Status: Running
- CPU & RAM: Should be minimal (Vaultwarden is very resource-efficient)
Troubleshooting: If the container doesn’t start, click Details → Log to see error messages.
Accessing Vaultwarden Web Interface
The big moment! Let’s test if everything works.
First Access
- Open a web browser on a device in the network
- Enter the URL:
https://vault.ben - Press Enter
What should happen:
✅ Success: The Vaultwarden login page appears without a certificate warning
❌ Error: Certificate warning or “Connection not possible”
Troubleshooting
Problem: “This connection is not secure” / Certificate warning
Solutions:
- Root CA not installed on this device → Repeat installation
- Clear browser cache and restart
- Check DNS resolution:
ping vault.benin the command line - Wrong certificate in reverse proxy → Check assignment
Problem: “Page cannot be displayed” / Connection error
Solutions:
- Docker container not running → Check container status
- Reverse proxy misconfigured → Check port 31850
- DNS not working → Check hosts file
- Firewall blocking port 443 → Check firewall rules
Test Admin Interface
Open the admin interface: https://vault.ben/admin
You will be asked for the Admin Token. Enter the password (not the Argon2 hash, but the original password!).
In the admin interface you can:
- Manage registered users
- Adjust server settings
- View logs
- Configure backup options
Creating First User
Since we set SIGNUPS_ALLOWED=false, users cannot self-register. You must create the first user via the admin interface:
- Go to
https://vault.ben/admin - Log in with the admin token
- Navigate to Users
- Click Invite User
- Enter the email address (doesn’t have to be real, it’s just a login name)
- Click Save
After that, the invited user can go to https://vault.ben/ and register (registration is disabled by SIGNUPS_ALLOWED=false, but invited email addresses can register).
Configuring Vaultwarden Clients
Now that the server is running, we set up the clients on all devices. Vaultwarden is API-compatible with Bitwarden - which means you use the official Bitwarden apps, but must change the server URL.
Browser Extensions
Never trust direct links to the stores. Always go through the official Bitwarden website: bitwarden.com/download
Configuration:
- Install the Bitwarden extension
- Before logging in: Click the gear icon (Settings) in the login window
- Enter the Server URL:
https://vault.ben - Click Save
- Now you can log in with the Vaultwarden account from the local network
Troubleshooting:
Errors in Bitwarden apps are unfortunately often not very informative. Here are some common problems:
❌ “Cannot connect to the server” → Root CA not installed or DNS not working
❌ No error message, but login doesn’t work → Wrong server URL or container not running
✅ Success: Login fields appear without errors
Bitwarden Desktop Client
Configuration:
- Install the Bitwarden desktop client
- At first start: Click Settings (gear icon bottom left)
- Scroll to Self-hosted Environment
- Enter the Server URL:
https://vault.ben - Click Save
- Log in with the Vaultwarden account
Tip for Windows: If the Root CA was not installed system-wide but only for the current user, the desktop client may not work. Install the Root CA in Computer store (see Preparation).
Bitwarden Mobile Apps
Configuration (identical for iOS and Android):
- Install the Bitwarden app
- At first start: Tap the gear icon top left
- Scroll to Self-hosted Environment
- Enter the Server URL:
https://vault.ben - Tap Save
- Log in with the Vaultwarden account
Important for mobile devices:
- Root CA must be installed (see Preparation → iPhone/Android)
- VPN must be active when you’re not at home (see next section)
- iOS: Root CA must be activated in trust settings!
Common Problem (iOS):
App shows “Cannot connect” → Root CA is installed but not activated:
- Settings → General → About → Certificate Trust Settings
- Set switch for Root CA to green
Test Synchronization
Test if synchronization works:
- Create a new password in the browser
- Open the mobile app → should be synchronized within a few seconds
- Change the password on the desktop client → should appear everywhere
If changes don’t appear immediately:
- WebSocket headers missing in reverse proxy → Check settings
- Manually synchronize: Tap Sync (refresh icon) in the app
VPN solutions at a glance
Option 1: WireGuard via router (🏆 RECOMMENDED)
The most modern and best solution for most users:
Supported routers:
- FRITZ!Box (from FRITZ!OS 7.50): Integrated WireGuard VPN
- UniFi Dream Machine / Gateway: Native WireGuard support
- pfSense / OPNsense: WireGuard package available
Advantages:
- ✅ Extremely fast and resource-efficient (ideal for mobile devices)
- ✅ Modern cryptography (ChaCha20, Curve25519)
- ✅ Very battery-friendly on smartphones
- ✅ Simple client apps for all platforms
- ✅ NAS-independent (also runs when NAS is off)
- ✅ Fast connection setup (<1 second)
Recommendation: If your router supports WireGuard, use this option! It is superior to all other solutions.
Instructions:
- FRITZ!Box: AVM WireGuard instructions
- UniFi: In the UniFi Network Console under Settings → VPN
Option 2: WireGuard on Synology (Docker)
If your router does not support WireGuard, you can run it directly on the NAS:
Advantages:
- ✅ All the advantages of WireGuard (performance, security)
- ✅ Works with any router
- ✅ Full control over configuration
Disadvantages:
- ⚠️ Somewhat more complex setup (Docker container)
- ⚠️ NAS must be running for VPN access
- ⚠️ Port forwarding required in the router
Option 3: Synology VPN Server (Fallback)
As an alternative if WireGuard is unavailable:
Available protocols:
- OpenVPN: Proven, widely used, works everywhere
- L2TP/IPsec: Good for older devices
- PPTP: ⚠️ NOT RECOMMENDED (insecure, outdated)
Advantages:
- ✅ Directly integrated into DSM
- ✅ Simple GUI configuration
- ✅ Works reliably
Disadvantages:
- ⚠️ Slower than WireGuard (especially OpenVPN)
- ⚠️ Higher battery consumption on mobile devices
- ⚠️ More complex configuration (certificates, ports)
Installing WireGuard client apps
Windows:
- WireGuard Download
- Install and import config file or scan QR code
macOS:
- WireGuard from the Mac App Store
- Import config or scan QR code
iOS:
- WireGuard from the App Store
- Scan QR code or import config file (via AirDrop/iCloud)
Android:
- Download WireGuard from the Google Play Store
- Scan the QR code or import the configuration file
Using Vaultwarden via VPN
Once VPN is active:
- Connect to the VPN (WireGuard or OpenVPN)
- Open
https://bitwarden.zuhauseas usual - Mobile apps synchronize automatically
Important: The domain bitwarden.zuhause must also be resolvable via VPN! If you use a DNS server in your home network, this works automatically.
Backup and maintenance
A password manager is useless if the data is lost. That’s why a solid backup concept is essential!
Backup Strategy
What needs to be backed up?
- Vaultwarden data:
/docker/vaultwarden/data(contains all passwords!) - Certificates:
bitwarden.home.key,bitwarden.home.crt, Root CA - Docker configuration: Container settings (preferably as documentation)
Option 1: Synology Hyper Backup (recommended)
Synology offers an integrated backup tool:
- Install Hyper Backup from the Package Center
- Create a new backup task
- Select the folder
/docker/vaultwarden/data - Select backup destination:
- External USB hard drive (local, fast)
- Other Synology NAS (network-wide)
- Cloud storage (C2, Glacier, Backblaze) - encrypted!
Backup schedule:
- Daily: Incremental backup (changes only)
- Weekly: Full backup
- Versioning: At least 30 days of retention
Important: If you are backing up to the cloud, use client-side encryption! Your passwords should leave the NAS encrypted.
Vaultwarden’s own backup
Vaultwarden supports SQLite backups:
- Stored in
/docker/vaultwarden/data/db.sqlite3 - Important: Do not copy the file during write operations!
Better method: Use the admin interface:
- Go to
https://bitwarden.zuhause/admin - Click on Backup Database
- Download the
.sqlite3file - Store it securely (encrypted!)
Maintenance and updates
Updating the Docker image:
Vaultwarden releases updates regularly. Here’s how to update:
- Open Docker → Registry
- Search for
vaultwarden/server - Click Download →
latest(or a specific version) - Go to Container → Select
vaultwarden→ Action → Stop - Click Action → Reset
- Select the new image
- The container will be recreated with the new version
Important: Volume mappings are retained-no data will be lost!
Before every update: Create a backup!
Monitoring
Monitor the Vaultwarden container regularly:
- CPU/RAM usage: Should be minimal (< 100 MB RAM)
- Container logs: Check for errors (Docker → Container → Details → Log)
- Certificate expiration: Renew server certificate before expiration (maximum validity of 397 days!)
Set reminder: Server certificates are expiring! Set a calendar entry for 350 days after creation to renew the certificate in time.
Disaster Recovery
Worst-case scenario: NAS dies, all data lost. What to do?
With backup:
- Set up new NAS
- Install Docker
- Recreate Vaultwarden container (same configuration as above)
- Restore backup in
/docker/vaultwarden/data - Start container → All passwords are there!
Without backup:
😱 All passwords lost. Make backups!
Lessons Learned
- 3-2-1 rule: 3 copies, 2 different media, 1 offsite backup
- Encrypt cloud backups: Don’t trust anyone else with your passwords
- Test restores: Perform regular restore tests-a backup is only good if it works!
- Document the configuration: Write down Docker settings, ports, environment variables
Common problems and solutions
“This connection is not secure” / certificate error
Causes:
- Root CA not installed on the device
- Root CA installed but not activated (iOS!)
- Browser cache shows old certificates
Solutions:
- Check root CA installation
- Restart browser completely (don’t just close the tab)
- Clear browser cache
- iOS: Check trust settings (Settings → General → About → Certificate Trust Settings)
Vaultwarden won’t load / “Cannot connect to server”
Causes:
- Docker container isn’t running
- DNS isn’t working
- Reverse proxy is configured incorrectly
- Port 443 is blocked (firewall)
Solutions:
- Check container status: Docker → Containers → vaultwarden should be “Running”
- Test DNS:
ping bitwarden.homein the command line - Check reverse proxy rule (port 31850, localhost)
- Access container directly:
http://<NAS-IP>:31850(should work, but without HTTPS)
Mobile app not syncing
Causes:
- WebSocket headers missing in reverse proxy
- VPN not active (if not at home)
- App closed in the background (iOS energy-saving mode)
Solutions:
- Reverse proxy → Custom header → Check WebSocket
- Synchronize manually: Tap the sync button (circular arrow) in the app
- Open the app in the foreground, then it will synchronize
Advanced configuration (optional)
Enable 2FA / two-factor authentication
Additional security layer for accounts:
- Log in to the web interface.
- Account Settings → Security → Two-step Login.
- Select a method (authenticator app recommended, e.g., Google Authenticator, Authy).
- Scan the QR code.
- Enter the code → 2FA active!
Important: Store the recovery codes in a safe place! If you lose the authenticator device, you will no longer be able to access your account.
Conclusion
Done! You are now running your own password manager on the Synology NAS-independent of cloud services and with full control over your data.
What we have achieved:
✅ Digital sovereignty: passwords remain within the network
✅ Cost savings: no monthly/annual subscription fees
✅ Security: HTTPS encryption, no direct internet access
✅ Convenience: Synchronization across all devices (Windows, macOS, iOS android)
✅ Flexibility: Full control over updates, backups and configuration
Next steps:
- Migrate passwords: Import passwords from your old password manager (Bitwarden supports imports from 1Password, LastPass, etc.)
- Set up all devices: Set up the Bitwarden apps on all devices
- Test backup: Perform a restore test to ensure that the backups are functioning
- Invite family: Create accounts for family members and share passwords via “Organizations” (Vaultwarden feature)
Advantages and disadvantages at a glance:
Advantages:
- No dependence on cloud services
- No running costs (only the power costs of the NAS)
- Full control over data
- No limits on devices or vault entries
- Data protection compliant (GDPR) - data remains in the EU/Germany
Disadvantages:
- Initial setup requires technical knowledge
- Maintenance and updates are your responsibility
- Backup strategy must be organized yourself
- Not accessible on the go without VPN
- Single point of failure (if NAS fails, no access)
Is Vaultwarden right for you?
Vaultwarden is ideal if:
- You already have a NAS (otherwise it’s usually not worth buying one just for this purpose)
- You have basic technical knowledge (Docker, HTTPS, VPN)
- You value data protection and digital sovereignty
- You are willing to manage maintenance and backups yourself
Stick with cloud services if:
- You want a “fire and forget” solution (no maintenance required)
- You don’t have a NAS and don’t want to invest in hardware
- You don’t want to/can’t set up a VPN
Another step towards digital independence and sovereignty.
Related articles
Dec 27, 2025 · 4 min read
Install Home Assistant on Synology NAS with Docker
Die deutsche Version findest du hier: Home Assistant via Docker auf einer Synology NAS installieren Home Assistant is the “hub” …
Dec 27, 2025 · 5 min read
Home Assistant via Docker auf einer Synology NAS installieren
You can find the English version of this guide here: Install Home Assistant on Synology NAS with Docker Home Assistant ist für viele der …
Oct 22, 2025 · 18 min read
Vaultwarden (Bitwarden) mit Docker auf Synology NAS selbst hosten
You can find the English version of this guide here: Self-Hosting Vaultwarden (Bitwarden) on Synology NAS with Docker …
Author

BEN ABT
Ben is a Principal Software Engineer at Medialesson.de, with a strong focus on .NET and Microsoft Azure. In his professional role, he designs and builds highly scalable platforms for hybrid and cloud-based scenarios. He also advises companies and C-levels on migrating to the sovereign cloud.
He runs myCSharp.de, the largest and most active German-speaking C# community forum, actively contributes to both his own and external open-source projects and regularly shares his knowledge through his blog, at community events, conferences and as a writer for technical magazines.
Let's Work Together
Looking for an experienced Platform Architect or Engineer for your next project? Whether it's cloud migration, platform modernization or building new solutions from scratch - I'm here to help you succeed.
Comments